


I've wanted to make a play tent for a long time. I saw felt houses you can throw over a card table about a year ago, and I knew this was something I 'needed' to put on my list of things to give the cutest baby in the whole entire world of my family members-Blythe Ann Cutie Pie Bug Ear Baby Girl. I asked my cousin (her dad) if they owned a card table. He said, "No." Umm....I don't understand this, I own three card tables! Short of buying him a card table he would then have to take back to California, I let it eat at me for months. And then I saw this super cute tutorial making a play tent using a hula hoop on Living With Punks. I did not pass go, I did not collect 200 dollars. I ran out and and began buying supplies. I'm not really one to follow too many directions, so if you want really well written sewing directions, go check out her tutorial. My style is pretty sloppy, but I'm proud of my tent. The instructions I'm about to write are more for me, like I said, they are very inexact, but....I'll know what "I" mean. If you'd like a good laugh at my sewing inexpertise....feel free to follow along. I assure you there isn't a Home Ec teacher in the world that would claim me as their former student (I did take ONE semester), but I don't care. I love this play tent idea so much, I'm thinking about keeping this one.....better yet, I'm thinking about keeping Blythe with the tent at my house. It's the best of both worlds!
Supplies: 2 flat twin size sheets (I found these for 3 bucks a piece at Walmart, yellow is my cousin's favorite color, and since it will be in his house with his daughter, assuming Plan A-Keeping Blythe, doesn't work out....), I also bought a yard of fabric (which was MORE than I needed for the little decorative edges, but....more is better than too little), rick rack for the flower stems, felt, and buttons for the flowers, a hula hoop (I found this one for 3 bucks at Academy Sports), and a ribbon scrap for the top of the tent. 
Instruction: I started with the 'top.' I cut out triangles, and I actually used the measurements for a play tent I found here at Blue Cricket Design. I cut out six triangles with a base of 22, and side edges that measured 24 inches each.

I sewed all six pieces together along the 24 inch edge, and then, as I got to the sixth piece and sewed the first and sixth together, I inserted the ribbon to hold the entired tent up, created a loop and then sewed back and forth 5 or 20 times to hold it in place.

I then turned it inside out and pinned it on the hula hoop.

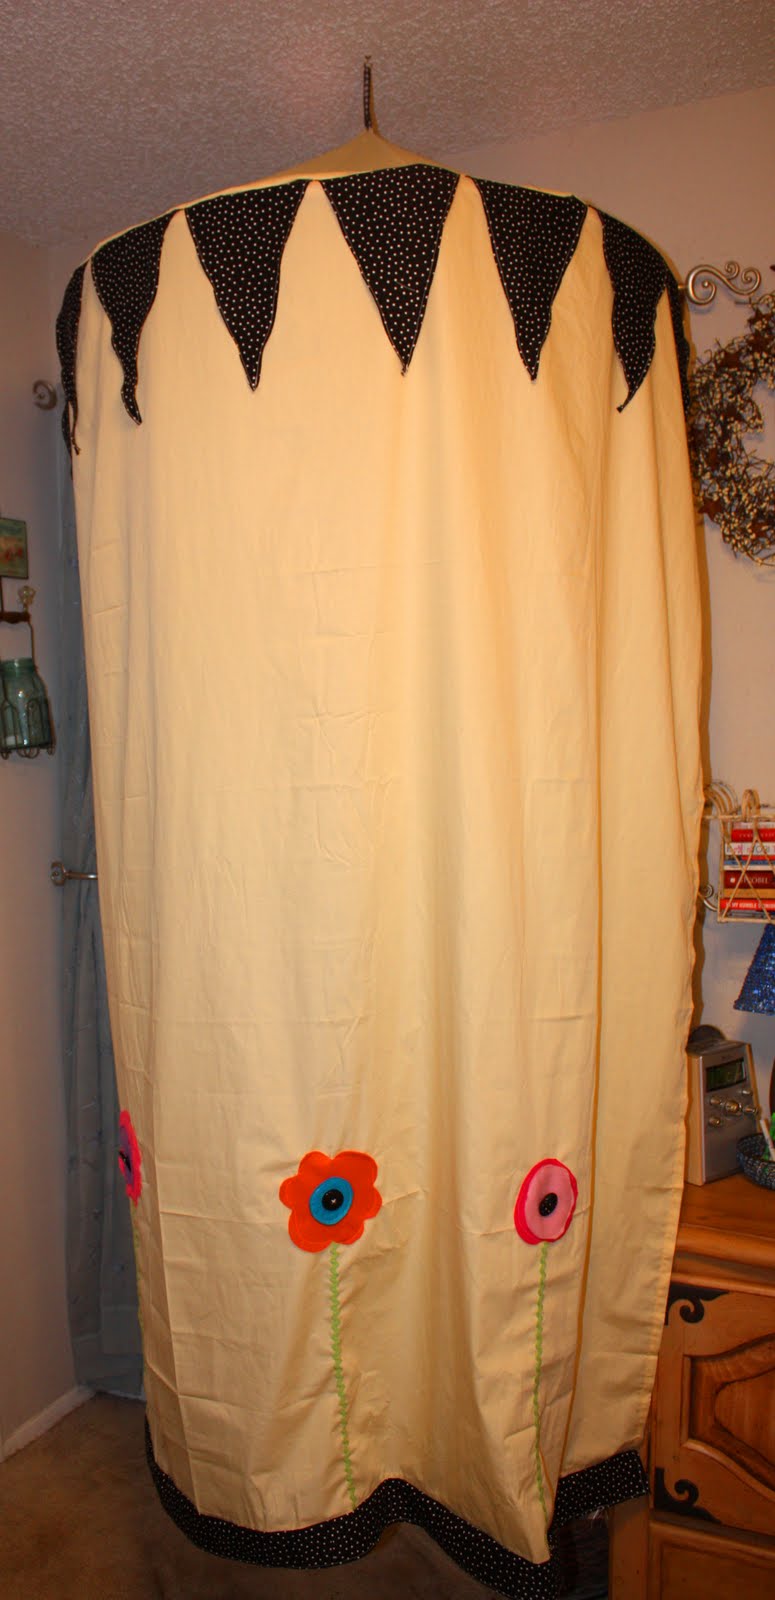
Next I took the second sheet (I had left over from the first sheet....I'll be able to put this to use on one of the 3,456 projects I plan on working on this month, I could have added a little more to the width of sheet two if I wanted the tent to meet completely, but....I didn't. Mostly because I'm lazy, but also b/c....I didn't want to.). I cut out 8 inch wide triangles, sewed the edges, and then just attached them along the top of the sheet that would be sewn onto the tent top later.


Ignore the wrinkles....I did. OK...I didn't, but....I had a few arguments with the sheets even after ironing. I think it'll be OK once it hangs from a ceiling for awhile. I sewed another black piece of fabric to the bottom, just because I felt like it.
I added big buttons to the flowers. I'm sure I broke 17 or 18 child safety laws when I added the buttons.


I then pinned the bottom sheet to the top 'tent'. Since the top was attached to the hula hoop, it gave me a more exact idea of how to pin this to create the circle. I sewed it with the two right sides facing each other. You could also draw a circle with a pencil using the hula hoop as a guide to save the needless pinning, but where is the fun in that? I removed the hula hoop from the top. I made 6 ties I sewed 5-50 times back and forth near where the two fabrics met. I should also say, I just cut these ties out of the portion of the sheets where the seams were turned under along the sides...a sloppy version of 'my' own binding. It's several layers of fabric, already sewed, so....it worked for me!


This could potentially be washed since it can be removed from the hula hoop. I could cover the hula hoop with colored electrical tape or something, but....I'm OK with this too. I'm easy to please, I hope Blythe is too!

This really wasn't as complicated as I expected, I've been putting it off in 'fear.' I probably took me three hours or less....most of that time was spent with the flowers, and a few embellishments. I can't say I'm going to make another one tomorrow, but I can almost guarantee I WILL make another one someday....perhaps when someone else in my family has the cutest baby every born since Blythe Anne Pumpkin Pie Cutie Bug....you get the point. Oh, and did I say I'm not posting Christmas gifts early this year? Yes, but I'm getting around this by posting gifts and not saying who they are fore, and posting gifts for small toddlers. Blythe is 15 months, I think her parents are still limiting her internet access. I should also say I have at least 20 post I've set to post over the next few months of Christmas gifts I said I wasn't going to post before Christmas, OH WELL! I shall now go work on blocking my friends, and family access to my blog....or not. I can't decide if I like inside shots where the colors are more true, or outdoor shots better, so I'll end with the rest of the outdoor shots.


Linking To:


12 comments
That looks so great. I know a munchkin who would love one. I'm with you on the kinda sloppy sewing style....my Home Ec teachers would never claim me as their own, I am sure. :-)
This playtent is so cool! My kids would LOVE this!!!
www.makingmemorieswithyourkids.blogspot.com
I love your take on the play tent. He will have so much fun with it! Great way to make sure it is washable. Visiting from PonyTails and FishScales.
~Kimberlee
www.thespunkydiva.blogspot.com
So cute. now maybe i will get around to making one for my little girl.
Thanks for your kind comment on my blog! Check back today... it's a cute one!! By the way, I am going to be doing a giveaway tomorrow, so add me to your sidebar links to get a head start!! :)
What a super cute idea! I'm sure your little cutie-pie cousin(?) will love it. It doesn't look very difficult, and you can't beat using sheets. Thanks for linking with FFT.
Very cute! Love the patterns and flowers...great job! Thanks for sharing at It's Party Time Thursday @PonyTails&FishScales!
Hey that looks great and I love the idea of doing the pennant style instead of the scallop!!
~Susan
Shut UP! You did NOT make that!!! Incredible! I've seen one made by Haba that I so want but I'll have to buy it for myself...um I mean for ER.
[color=#5588aa]Nice web site! I haven't noticed christyrobbins.blogspot.com before in my surfing!I found very useful information about
[/color] [url=http://nuscin-online.info]anti-aging[/url] [color=#5588aa]here... Keep up the good work![/color]
[color=#5588aa]Great post! thank you for sharing this information. christyrobbins.blogspot.com really got under my
[/color] [url=http://nuscin-online.info]skin,[/url] [color=#5588aa]bookmarked... Keep up the great site...[/color]
Thanks for the great Idea... here is my version after I checked yours out!! http://franticcraftingwithlaura.blogspot.com/p/sewing-crafts.html
Post a Comment